|
Painting subject: camel train Following an art demonstration that Jake Winkle gave to Lacock Art Group last year we were keen for him to return to run an all-day watercolour workshop and secured the date of Saturday 25 Jan for exactly that. Our all-day workshops are reserved only for members of Lacock Art Group, with places offered on a first come/first served basis due to space limitations. All 16 places were taken quickly, making it a full house. Workshop materials Jake’s go-to watercolour paper is Arches rough,140lbs, which he prefers to use because it offers good absorbency and dries evenly. However, a good quality watercolour paper like Arches is expensive so it’s worthwhile shopping around various art supply websites in search of the best price. You can often find it on special offer. He advises stretching the paper first, to avoid cockling (bending) when it gets very wet and to help prevent the paint from puddling and/or creating cauliflowers. Jake’s tried and tested method for stretching paper is to put a sheet of in a bath tub of water and let it soak for one minute. Then remove the paper and leave it for 5-10 minutes to expand and then dry. When it’s ready to use, fix the sheet of paper to a board using gum tape (not the self-adhesive paper tape for sealing the reverse of picture frames) on all four sides. You could also use masking tape but this tends to become loose and peel off if it gets too wet. Palettes, paints and brushes
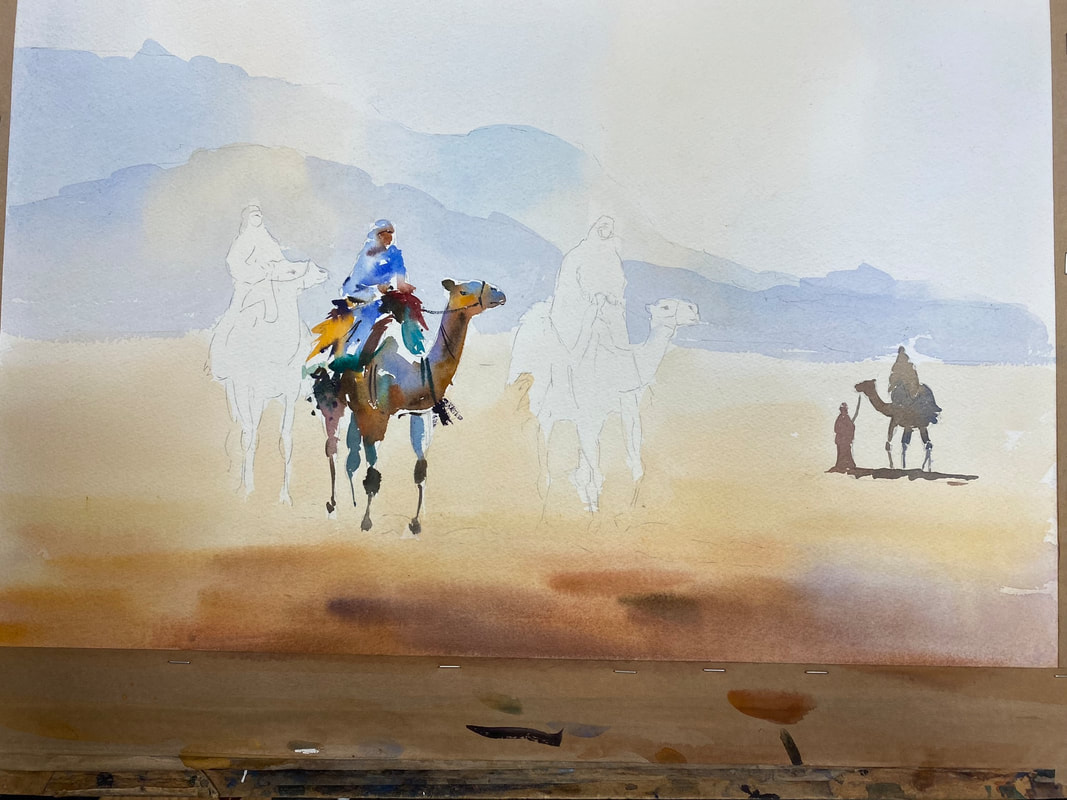
Workshop Jake explained that the aim of this workshop was to achieve a light touch, loose, simple style. By simple he means no details, impressionistic. The subject is a desert scene of a camel train, with hills in the distant background. As the focus of the workshop was on painting rather than drawing, to save time, he provided us with a template of the drawing to trace onto our own paper. At every step in the process Jake demonstrated the technique to attendees before letting us loose on the painting. Then while we got on with it, he walked around to each person to see how they were doing, offering advice and answering questions along the way, which was really helpful. Sky and foreground - initial wash He asked us to wet the paper with water first using a large brush - buying time to put the wash on, Jake assures us. Having already mixed up a pool of pale, watery cobalt blue we applied it at the top of the paper in long, light strokes, alternating the blue patches with a watery, yellowy orange colour (raw sienna or yellow ochre). We took this variegated wash down to the bottom of the mountain range.
With the paper still damp, we move on to the sand, starting at the bottom and working quickly, wet into wet, putting the orange colour on first (using light red or similar, with raw sienna/yellow ochre) making the wash paler and yellow as it moves up towards the base of the mountains. While it’s still wet, go in with a stronger, more intense orange/brown col in the foreground, darkening it with ultramarine blue and splashes of purple if we liked. Ensure that the top colour is stickier in consistency than the colour of the layer below it. Mountains Jake guides us through putting a slightly stronger wash of cobalt blue on the far distant hill again alternating with orange/yellow to create the sun’s glow, stopping just above the top line of the second, mid-distant mountain. The initial wash had to be dry before applying the next layer. A slightly darker cobalt blue with a tiny dab of alizarin crimson goes on this second mountain, as well as the orange/yellow colour. Camels The smallest camel on the right of the painting is a silhouette, using a neutral, darkish colour (such as sepia, or ultramarine blue and burnt sienna). Next the focus is on the middle camel in the main group of three, painting the rider first. Jake shows us how to approach this, by using fragmented brush strokes – breaking up the marks and leaving parts of the paper white. The approach also suggests detail using gestures (e.g. riders’ hands and faces, using sticky light red), and encourages us not to copy the colours of the reference photo but to try to use other colours like blues, yellows, purples.
We use cobalt blue, orange and yellow or red for the camel’s body and a neutral blue grey colour on the legs. Jake urges us to leave gaps between the camel’s leg joints rather than paint the legs with one continuous brush stroke as this adds interest. Using a similar approach we then paint the camel on the far left before tackling the one on the far right of the group, completing the trio.
To finish off Jake showed us how to paint the shadows of the camels, which helps to ground the animals in the painting. He makes a sticky mix of cobalt blue, light red or alizarin crimson and paints in the shadow, which falls in a left to right direction. The last word Everyone attending Jake’s workshop thoroughly enjoyed themselves. It was highly informative, good-humoured, and everyone pitched in regardless of their experience with watercolour. Massive thanks to Jake for his patience on the day, and for showing us a range of techniques that we can take forwards into our future paintings. To see the paintings produced by attendees during the workshop please go to the 2025 Jake Winkle workshop gallery. Thank you for reading.
0 Comments
Painting a contemporary landscape in watercolour Our next art demonstration on 20 February features well-known, Berkshire-based artist, Elizabeth Baldin, who will focus on her approach to painting watercolour landscapes. This takes place at Lacock Village Hall and replaces our usual Thursday night session.
 To find out more about Elizabeth Baldin and her work please take a look at her website.
See you at the demo! |
WelcomeRead about our latest activities and initiatives here! Archives
February 2025
Categories
All
|
- Home
-
Galleries
- Workshops >
- Challenges >
-
Members' Galleries
>
- Richard Adams
- Ken Baldy
- Keith Bennet
- Graham Brewster
- Victoria Cleverly
- Sarah Clover
- Dave Cooper
- Chris Crosby
- Margaret Gray
- John Harris
- Jacqui Matthews
- Vanda McCann
- Graeme McFaull
- Karen McGreevy
- Glyn Overton
- Sally Parsons
- Linda Ridler
- Karen Road
- Kay Smith
- Joy Tickell
- Jane Tucker
- Elspeth Wales
- Tracy Warne aka Maggie
- Angela Weir Martin
- Mike Wilson
- Exhibitions
- News/Blog
- Membership
- Events
- Contact


 RSS Feed
Site powered by Weebly. Managed by netnerd.com