|
On behalf of Lacock Art Group its chair, Joy Tickell, went back to school in early December to present a voucher for £175 to Lacock Primary School to spend on art materials. The money was raised from the profits made at the Group’s exhibition in November, which was held at Lacock Village Hall, where members of the art group also meet on Thursday nights to draw, paint and learn techniques from one another. The voucher is redeemable at Artway in Melksham and given by the members of Lacock Art Group as a gesture of support for the local community. Joy presented the voucher to two children from the ‘school council’ during the school’s celebration assembly when children were presented with certificates in recognition for a range of achievements and accomplishments, such as good performance and being helpful.  Joy said: “I explained a little about LAG, the exhibitions we hold and how that, as we had enough money in our bank account, we could donate the profit of our November exhibition to their school. It was a lovely occasion. The children were amazed and appreciative of the amount we donated, and it was a pleasure for Lacock Art Group to be able to make this donation. I hope this will also encourage some budding junior artists!”
In fact, two of the children excitedly declared their knowledge of Lacock Art Group via their Nan (Karen McGreevy) and Mum (Victoria Cleverley), who are both current members of the Group and skilled artists in their own right. Our thanks go to personnel at Artway who were very helpful in producing an A4 sized voucher for Joy to present to the children (above).
0 Comments
Getting started Catherine returned to Lacock Art Group in November 2022 to explain and demonstrate her experimentally loose watercolour style in a painting featuring colourful, abstract lake reflections. She also showed us how to create atmosphere as well as maintain bright colours by merging real colours directly on the painting’s surface in a controlled cascade. Catherine began by explaining that she used to paint in oils but now paints in watercolour predominantly, which is why she uses 'thick, juicy' paint. Bright colours are a hallmark of her paintings.  Reference photo Painting process Her typical approach to a painting is to start with the focal point of the scene and develops it from there, using photos of landscapes for reference. When choosing water as a subject, Catherine pointed out that still water is easier to paint than fast moving water like crashing waves, waterfalls or rapids, due to there being less white space which makes it easier to control. When you’ve selected the scene you want to paint, look at the photo closely to find the way in to the focal point. For instance, is there a winding river that leads the eye, as in the example photo above? To get started Catherine does a sketch outline, putting in shadows and other notable features. She tends to use Daniel Smith paint – they are often quite granular and it’s interesting to see how it contrasts with transparent paint. Moonglow is a good example; a purple grey, which is very granular in texture.  Outline sketch (bottom right) Once the sketch is down on paper, Catherine wets the focal point area first using lots of water, letting it drip down the page. Due to volume of water applied she uses a watercolour board – watercolour paper that’s glued to card backing board; not only does it cope well with a lot of water it doesn’t need stretching. All good art suppliers stock watercolour board. In common with many watercolourists, her technique involves applying layers of paint to build depth and colour. The scene chosen for this demonstration has reflections in the water and Catherine recommends painting the trees and their reflections at same time. A useful tip to check whether the reflections are right is to turn the paper round ie if painting in landscape view, turn the paper to portrait so the reflections appear horizontally on the page. Another tip she gives is to twist and turn the brush to make organic shapes rather than punching or stabbing the end of the brush onto the painting. She uses a flat brush for most of the painting. Allow this layer to dry a little and then add more detail.
Colours are key Catherine loves to use bright colours, in particular turquoise which is a frequent feature in her paintings. Other colours she often uses are Sap Green, Raw Sienna, and Cad Yellow. Cobalt Turquoise, by Windsor & Newton, is another of her go-to favourites; a very opaque, acidic colour, which she uses to attract attention. Colour scheme is always so important in a painting, she believes, because as the artist you really need to like the colours to like your painting. She suggests mixing turquoise and yellow to produce a wonderful lime green. You can use the lifting off technique to remove unwanted drips and to reveal white. At the demonstration Catherine used a No. 5 rigger and a ‘stumpier’ brush to lift off paint. If you have any excess paint left on brush don’t discard it; you can use it elsewhere on the picture. Watercolours dry lighter in colour than they look when wet, so take care not to over-correct the colour when the paint’s wet. If necessary you can lift off later to achieve the right depth of colour.
In this painting Catherine uses Moonglow for the waterline, applying it quite darkly. As you paint in more detail, reduce the ratio of water to paint to thicken the mixture. Again, you can lift it off later if it’s too dark; this lifting off technique can also be used to produce a softening effect. To create the effect of ripples in water, use end of a flat brush to cut into the paint, removing thin, horizontal lines of paint. Catherine showed how she uses a long rigger brush to paint tree branches – the rigger has a bounce to it that’s harder to control, making it an effective tool for painting features that don’t require a perfectly straight line. You can also use negative painting in spaces between branches to make them stand out. When this layer of paint had dried, Catherine rubbed out the pencil lines and from this point on recommended keeping additional detail solely to the focal point area of the painting. To bring the whole painting together she often applies a unifying wash, which dampens down the distant view and blends elements together. For example, bring blue in from sky and wash it over the trees to get a single colour. Catherine says she often walks away from a painting when it’s finished, returning to look at again with fresh eyes a couple of days later when you can see any problems in the painting. Catherine's demo was well-attended with an audience comprising art group members and guests, who fully engaged and asked some good questions. Our thanks to Catherine for delivering an excellent, informative, instructive and informal demonstration, which was very well-received by attendees. We look forward to her returning in the future.
Catherine regularly runs popular workshops and courses, which you can find out about on her website.
By Glyn Overton Pastels bridge the gap between drawing and painting whilst giving an extraordinary freedom with colour and mark making opportunities. They often open up for students a much greater understanding of mixing colour and the relationships between them as the colour is laid directly onto the page and unless blended too much they don’t tend to go muddy unless that is your intention. They sometimes give the impression that they are difficult to use but that couldn’t be further from the truth. You can overlay light over dark, blend colours to mix on the page, create exciting marks by using a variety of inventive techniques and generally have much more fun than with other painting techniques. They come in a variety of forms, hard pastels, soft pastels, pastel pencils, oil pastels and water soluble pastels. Soft pastels Pastels are made from ground pigment and a blender which holds the particles together, the soft pastels having a higher intensity of pigment to inner giving very intense colour and because of this they can be inclined to crumble. The range and intensity of colours, however, will give your work a very painterly outcome. Examples of these are made by Unison, Schminke, Daler Rowney and the better makes will give you stronger colour and a creamier texture. Hard pastels These are made with more blender and less pigment making them useful for defining detail. They can be used to complete a whole picture though it will be a slightly slower process. I often recommend the “Inscribe 64” box to people starting pastels as this box gives not only the bright colours but also some beautiful subtle colours which give your work a much more natural impression whilst in the early stages of learning to mix pastels. They can be used to give linear qualities by using the strong straight edge and fine detail with the corners. Conte pastels also fall into this category and were my introduction to pastels as a teenager. They also come in a range of natural colours so you can imitate some of the Renaissance drawings in chalk.  This cabbage was done using Conte Pastels, which are harder than pastel pencils. Pastel pencils Several firms make these, the easiest to get hold of are probably Derwent, Conte and Stabilo. I use the Stabilo ones as I find they work well over soft pastels to give outlines and definition to fine areas. You can just draw with them on their own and I often use them for quick life drawings and sketches outdoors as they are easy to take with you. They come in a huge range of colours and a box is always a good suggestion for Christmas and birthdays! The honeysuckle (below) was completed at Lacock Art Group meetings over three evenings and is entirely done with pastel pencils. They are extremely useful where there is a lot of detail as in the Shambles picture in York (below), and worked well for the wet pavements.
Oil pastels I often refer to drawing with these as like drawing with lipstick as they have quite a sticky, greasy consistency. They can produce some beautiful strong, pattern based images on their own or can be diluted with white spirit or turpentine to give softer results, demonstrated in the pictures below of the pumpkins and the churchyard.
,Water soluble pastels These also have a waxy consistency, like oil pastels, but if you brush over the drawing with water they can give an even, transparent wash. By varying the amount of water, a damp brush can soften the drawing whilst resting some of the linear quality and once dry you can return to the work and add more drawing if required. These are examples of oil pastel resist with water colour pastels diluted with water.
Techniques Pointillism It is quite fun to build up an image just using dots, mostly to create an optical mix of the colour. This is an example taken from a very small photo 5cm square, which I enlarged to 25cm square in one of my many efforts to stop working in so much detail.
Dashes and dots Beginning to think about using appropriate marks to achieve textural effects, whether to create fur and feathers, rust and decaying surfaces, or stone and moss on buildings. The marks you make suggest the feel of the subject matter, as shown in these three examples.
Portraits A variety of different pastels and techniques can be used when creating portraits. Soft pastels make blending easier and can be used in conjunction with pastel pencils for greater detail. Pastel pencils on their own are useful for quick sketches and life drawing. Either soft pastels or oil pastels can give a much stronger and bolder approach. These are some examples of differing techniques. Methods of working Pastels are much more like oil painting and acrylics than watercolour. I tend to start by thinking about what is in the background, like the sky and distance and then gradually coming forward in the picture, finishing with the foreground and main detail. This also applies to the use of colour, keeping softer and bluer hues in the background and building intensity and brightness as you move in the foreground. Light colours can be worked over dark much as in acrylics and areas not working can be removed either using a soft putty rubber or rubbing with a soft cloth. It is quite easy to build up an area again. I block in the background colours first and then work through the layers, as shown here.
Mark making skills Very much like all mediums, mark making skills are paramount. How can I make fur look different from a rough stone wall, or still water with reflections, or a bramble hedgerow? The answer can usually be found in the sort of marks you are making. Learn to play with the pastels. You don’t have to draw as though you were writing with a pencil. They can be rolled or used with the long side to block in large areas, twisted, heavy marks, soft marks, delicate pushed lines for twigs, smudged to create gradation and reflections, imprinted to leave the surface colour of the paper, and softened using a paler colour over the top. Just play and see what can be discovered. Here are some examples of mark making to help inspire you. I hope you have found this introduction to pastels informative and wish you success and enjoyment as you explore their use in your art.
Glyn is a member of Lacock Art Group - you can see her personal gallery here - and runs art workshops in Wiltshire (including at the White Horse Bookshop in Marlborough) and in Oxfordshire.
Getting to grips with figure drawing In October, professional artist Victoria Jinivizian gave members of Lacock Art Group an informal workshop in observational drawing at one of our Thursday evening meetings. Her model, Emma, accompanied Victoria along with some furniture props – a chair and stool. It was a great session, hugely informative (especially for those with little experience of figure drawing), challenging at times - total concentration required - and, above all, a lot of fun. Victoria taught us some essential techniques about how to approach figure drawing, and Emma, her model, positioned herself in several different poses for exercises for the class to tackle. The session started with Emma in a standing posed. Victoria’s first piece of advice was how to get the body proportions correct; by making three horizontal marks on your paper – one to indicate the top of the head, one at the model’s feet, and a third at waist level. She suggested we focus on four principles when figure drawing; height, width, angle (of limbs), and shape.
Next Emma posed sitting on a stool and Victoria asked us to apply the same principles and tips discussed above. The stool offered a perfect opportunity to put negative space/drawing into practice (you can read more about this in our blog by Chris Crosby about this technique posted at the end of September). Here are a few examples of the drawings produced in the first two exercises, kindly provided by some of our members.
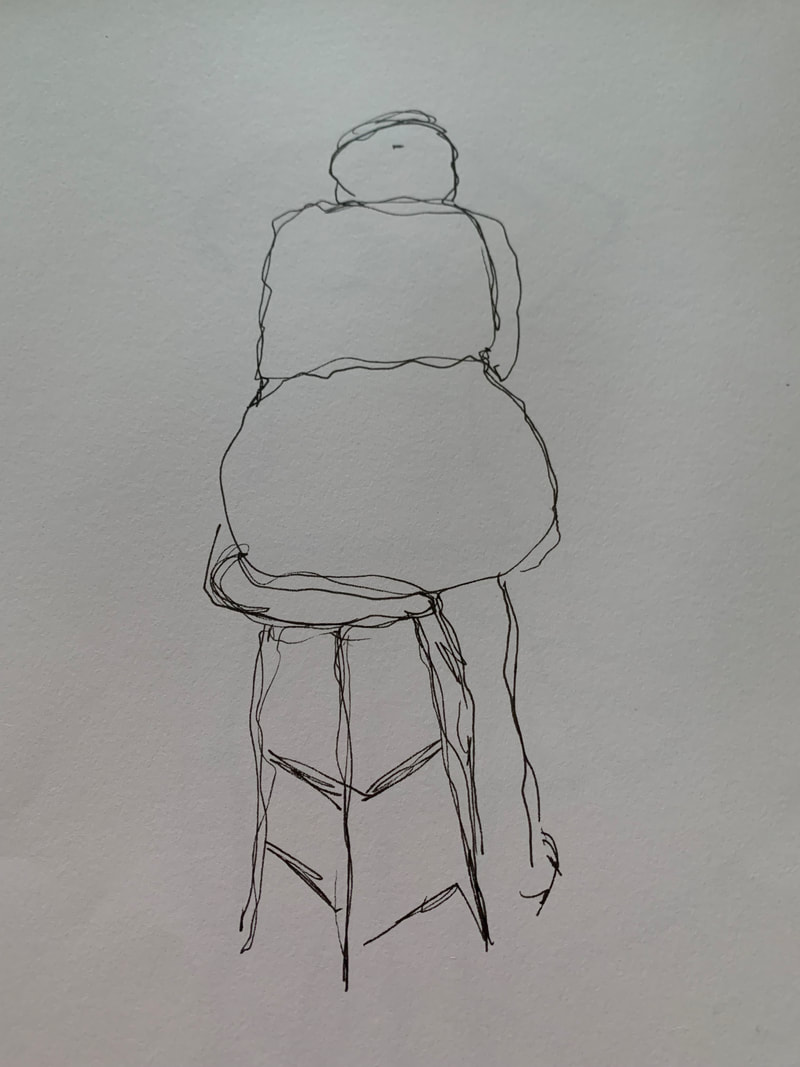
 By Joy Tickell Challenging exercises After easing us in gently with the first two poses, Victoria set us a more challenging exercise: drawing the figure without lifting your pen/biro off the paper, in one continuous line. Everyone found this very hard to do in practice but we were all more-or-less pleasantly surprised at the results! The aim of the exercise was to help develop skills in drawing the overall shape of the figure. You can see a couple of the end results below and in the sketch above by Joy Tickell, the figure on the far right of the three.
Don't look down! To stretch us even further Victoria’s next exercise involved drawing “blind”. The task was to draw the figure, using a pencil, looking constantly at the model, without looking down at the paper on which we were drawing. In this exercise Emma was sitting on a stool. The purpose of this exercise was to encourage you to study the model closely and continuously in detail. All agreed that this proved to be the hardest of all the exercises! The results were mixed – we suspect some people couldn’t resist a sneak peek at their paper! Interestingly, members appeared reluctant to share these drawings for the blog. Perhaps the attempt shown below on the right explains why, although apparently this is what the drawing is supposed to look like in this exercise!
Strike a different pose Attendees sat around the outer edges of the room with the model positioned in the centre, as you can see in this photo. Therefore, to ensure that everyone had the chance to draw the model from the front and back, Emma changed her pose a number of times.  For the last two drawings of the session Emma posed sitting on a chair. At this point Victoria explained how to use the background in the scene to ‘ground’ the model in the space, which helps to get the proportions of the drawing right. For example, the model was sitting on a chair and we observed where the floor met the walls and drew a line on the paper to represent this. Using this approach helps to position the model in the right place within the space. The drawing below demonstrates this technique very well.
We each produced six drawings in total during the workshop, with Emma in different poses, and Victoria gave us about 15 minutes to complete most of them. We had a little longer for the final drawing so that we could put in more detail. This featured Emma sitting on a chair, leaning forwards with her head propped up by her arm, which was quite a tricky pose to draw. A couple of examples drawn on the night are below.
To sum up, we all found Victoria’s drawing class a thoroughly enjoyable experience and one that provided us with a welcome challenge. It was good to try something different. Our thanks go to Victoria and to her model, Emma, for delivering such a useful and fun evening, and also to those of our members who provided images of their drawings to illustrate this article. You can find out more about Victoria’s work on her website. Please do take a look at it. Thank you. Next Lacock Art Group demo
Our next demo, which is open to non-members of LAG, is by Catherine Beale on Thursday 24 November. More information about this is featured in a previous post here on our blog. Join Lacock Art Group's demonstration on 24 November Catherine returns to explain her experimentally loose watercolour style through colourful, abstract lake reflections. She will show how to create atmosphere as well as maintain bright colours by merging real colours directly on the painting’s surface in a controlled cascade. Later she will use paint straight from the tube on top (a legacy of her oil painting days!). Catherine is a Member of the Society of Women Artists, a registered SAA Tutor and was recently appointed as a tutor at the Royal West of England Academy Drawing School. She has exhibited with the RWS and RI in London and regularly at the Bath Society of Artists annual show. This demonstration takes place at Lacock Village Hall, East Street, Lacock SN15 2LF, and starts at 7pm. Please arrive in good time so that we can begin promptly.  Example of Catherine's loose style. Image copyright: Catherine Beale. Open to non-members
Catherine's demonstration is open to non-members for a £5 fee payable at the door. However, to help manage numbers on the night, it would be helpful if you could use our general contact form or email us at [email protected] to let us know you plan to attend. Thank you. Cash prizes to be won! This year’s Oexmann Art Competition and Exhibition, organised by Wiltshire Museum in Devizes, starts accepting entries on 22 November until 26 November. A panel of judges, comprising three experienced, well-known artists, will select the winners on 30 November, with cash prizes of £500 and £300 awarded to the first and second placed winning adult entries. The Competition aims to encourage and promote Wiltshire artists of all ages and is open to anyone who was born or lives in the county. Note that the organisers may ask prize-winners for proof of birthplace or residence. You can choose any subject matter for your entries, which must be in 2D form i.e. painting, drawing, collage, printmaking, but photography and computer generated artworks are not acceptable. All entries must be original works. The competition judges will not accept work that artists have copied or plagiarised. An exhibition of the winning art and other selected entries takes place at the Wiltshire Museum from 17 December 2022 to 18 February 2023. Entrants may submit up to three entries each, but please be aware that a strict picture size limit is in place – frames must not exceed 80cm x 60cm, landscape or portrait orientation, in order to allow the maximum number of entries to be displayed in the Museum. Entry costs £3.50 per picture for the over-18 category.  Entry form and criteria To enter you need to complete the entry form that’s available to download from the Wiltshire Museum’s website. The entry form also gives details about the full entry criteria. You have to print and complete both sides of the form and take it with you when you deliver your entries, which you can do during the usual working hours from Tuesday 22 – Saturday 26 November, 2022. To check the opening times please go to Museum’s visitors’ web page. If you have any queries about entry please contact the Competition Manager, Heather Ault, on 01380 727369 or email her at [email protected] Good luck to anyone who enters!
Calne’s annual Music and Arts Festival (CMAF), providing entertainment for local people and showcasing local musical and artistic talent, runs from 7-16 October. An extensive range of events take place throughout the 10-day Festival so there is sure to be something that appeals to everyone. An open art exhibition is the festival’s centrepiece, open to the public from Saturday 8 October to Sunday 16 October. The exhibition at Marden House in Calne presents hundreds of artworks from beginners to internationally renowned artists with a local connection. All art displayed is for sale. Please check the CMAF website programme for the exhibition's opening times as they vary at weekends and weekdays; you can also book tickets for various events on its site. This weekend the exhibition is open from 10am to 4pm on Saturday 8 October and from 10am-2pm, and 4pm-5pm on Sunday 9 October. A few of our members are exhibiting this year so, if you’re able to, please visit the exhibition and show your support. Festival event: meet the artist – Chris Dunn A ‘meet the artist’ talk featuring local, acclaimed illustrator Chris Dunn in conversation with Genevieve Sioka (the Festival’s exhibition co-ordinator) takes place on Saturday 15 October from 10am-12pm. Chris, who is an expert watercolourist, will be answering questions and signing books. The talk is free but if you'd like to attend please book tickets for it on the CMAF website. You can also see some artworks by Chris on display at a separate, free, exhibition, which features his children's book illustrations, taking place at Calne Heritage Centre, SN11 0SQ. Open from 10am - 4pm, Wednesday - Saturday, 5th-29th October (closed on Sundays), the show features mainly prints of his watercolour illustrations for 'The Wind in the Willows', however, some of his original paintings are on display and there will be plenty of cards and books to look at too.  Other Calne Music and Arts Festival events ‘Drink and draw’ at the Piggy Bank Micropub is always a popular event during the Festival. This sounds like a fun evening – no artistic talent needed, just oodles of enthusiasm – so if you like to draw and have a drink join this event at the Piggy Bank, Calne on Monday 10 October at 7pm – again, you can book tickets on the CMAF website. Numerous musical events take place as part of the Festival including performances by Opera Anywhwere, The Serenata Guitar Trio, The Yehudi Menuhin School, the Kassia Trio, jazz duo Kit Hawes and Aaron Catlow, the Calne Singers performing ‘Songs from the Shows’, sea shanty singers the Roaring Trowmen, Tim Hughes takes you through ‘120 years of the Blues’ and a piano recital by accomplished accompanist and chamber musician Helen Davies. Local schools are taking part too: 17 year old Royal Wootten Bassett Academy student, Louis Stephenson, gives a piano recital, music scholars from Marlborough College perform a lunchtime recital, music scholars of St Mary’s School, Calne, perform on a variety of instruments, primary schools in and around Calne present ‘Songs from Disney’, and the Kingsbury Green Academy Music Department give a late evening concert. To book your tickets for any of the Festival events please visit its website. In other news: solo show by Catherine Beale - 'home ground' at The Packhorse, Bath
Local watercolour artist, Catherine Beale, is staging an exhibition of new works inspired by her home ground - the villages and valleys around The Packhorse pub in South Stoke, Bath BA2 7DU. For this exhibition Catherine brings together a collection of rich watercolours celebrating the area, drawing on sunlight effects, quiet spaces and trees that mark time passing. Exhibition dates: Opening night on Thursday 20 October from 5pm – 10pm. Friday 21 October – coffee and demo with the artist at 11am. Exhibition open until 11pm. Saturday 22 October – open from 12 noon to 11pm. Final day Sunday 23 October – 12 noon to 6pm. NB Catherine is also giving a demonstration to Lacock Art Group on Thursday 24 November. We will give more information about this in a future blog post. By Chris Crosby Good composition in a painting is vital, and using negative space can be a way of balancing elements, helping to add interest to the whole work, as well as improving the accuracy of drawing. Negative space is the space around and between the subject of the image, whereas the subject of the artwork occupies the positive space. Negative drawing is also useful for adding outlines and colours where you might otherwise struggle to find a way. I use this method in my work with coloured pencil; it is not possible to colour white over darker colours, and saves having to pre-think which areas I need to colour white first. Here are some examples of my work to show what I mean Looking at the black and white Schnauzer, you can see that I’ve made the shape of the eyebrows and beard by working back into the space with a black pencil. With the Westie, I have gone into the edges of Alfie’s fur with the rust pencil, to outline him.
There are many examples of negative drawing and positive/negative space available on the internet (of course!), some of which I’ll share here: UK artist Rebecca Mills Negative space is used in photography and design and there are examples everywhere we can see in everyday life. Negative space is used a great deal in logo design as we see in the FedEx logo and the white arrow that is created in the negative space. Once you sharpen your eye to negative spaces you might find yourself spotting the hidden shapes in them everywhere. You can read more about this on Rebecca’s website. UK Artist Mike Sibley What do you see when you look at this picture below? Do you see an ancient black drinking cup? Maybe an ebony candlestick holder? These are the positive images. Or do you see two white faces both looking at each other? Think of these faces as the negative areas or what I call White Space. Imagine yourself seeing these two faces on white paper and filling in the space between them in black so the faces are revealed. This is Negative Drawing - seeing the space and not the line. Teaching yourself to see White Space is one of the best lessons you will ever learn.  If you want more tips and to practice negative drawing take a look at “An introduction to negative drawing with Mike Sibley” published on the Art Instruction website. You can also find some articles and videos on the topic (pay to download) on Mike Sibley’s website. Other links to useful articles about negative drawing/space:
https://emilysnotebook.co.uk/all-posts/negative-space-drawing/ https://theartyteacher.com/what-is-negative-space-in-art/ The renowned graphic design artist, Escher, is known for using negative space in his art – read all about it here. You can also deploy negative space to great effect in paintings, as explained in this post on Draw Paint Academy. I hope you find this post informative - thank you for reading. Lawrence Art Society's exhibition returns to Devizes Town Hall 29 September to 1 October 2022 At the end of this month the major, three-day, annual exhibition held by our friends at the Lawrence Art Society takes place. Last year 250 artworks were exhibited with a total 'display' value of £50,000 which demonstrates how significant an undertaking it is to stage such an event. This year's exhibition will feature an extensive range of paintings in various styles, media and subject matter. Please do your best to support this exhibition by visiting it and/or telling your family and friends about it! Entry to the exhibition in Devizes is free; it's open from 9.30am-5.30pm each day, from Thursday 29 September to Saturday 1 October. Details are on the poster below, or more information is available on the Society's website. Calling all artists ... the 14th Annual Pound Arts Open is back! Corsham-based Pound Arts has announced the submission dates for entries to its forthcoming exhibition as 9am on Friday 16 September until midday on Friday 4 November, 2022. This is the largest exhibition of the year at Pound Arts and exhibitors have the chance to win one of three fantastic cash prizes (including £250 from Corsham Town Council and £200 from Right Angle Picture Framing, as well as the opportunity to win a solo exhibition at Pound Arts! Brief details are below with more information about criteria and how to enter available on the Pound Arts website here. Dates of the exhibition itself are yet to be announced. Good luck to everyone who submits an entry, especially members of Lacock Art Group! Please let the Committee know how you get on.
Attention oil painters: limited opportunity to obtain free PDF of Ted Spurgeon's book "The Living Craft" If you are an oil painter who enjoys making your own mediums this book is a 'must have'. The current edition of Ted's book (edition 14), which is all about the creative process associated with oil painting, has now completely sold out so he is offering the PDF for free. He has spent many years exploring historic oil painting materials and methods and his book documents his exploration of ways of refining oil and creating mediums that are based on Old Master techniques. For a limited period - until the end of October - you can download a free PDF of the 500-page book. Given the size it may take some time to download! It comes highly recommended by one of our members who has followed its guidance and already made her own cold wax and will be having a go at making 'putty'! Take a look at Ted Spurgeon's website to find out more about the artist and his book which can be downloaded here. Finally, to find out about future exhibitions and demonstrations held by Lacock Art Group please visit our events page.
Thank you. A sunny, successful exhibition weekendIt was great to see, and welcome, so many visitors to our annual three-day, August Bank Holiday exhibition. The lovely, sunny, warm, dry weather helped visitor numbers return to somewhere close to pre-Covid levels, both to Lacock village itself and, as a consequence, to our exhibition. We'd like to say a huge 'thank you' to everyone who visited our exhibition over the weekend, including local people, those on a day out with their families, and visitors from further afield in the UK and abroad. As ever, in addition to human visitors, it was a pleasure to also welcome a variety of well-behaved four legged friends! A fun, friendly atmosphere prevailed and we are most appreciative of the many compliments we received about the standard of art on display. Thanks to all members who supported the exhibition, whether by exhibiting and/or assisting in its set-up and close-down. SerendipityOne serendipitous moment stands out from the exhibition. Fred Taylor, one of our member artists, often paints superb, highly detailed, realistic paintings of locomotives and his painting of the 'Penrice Castle' train was on display at our August exhibition. This train was built in June 1949 by the Swindon Works (GWR/British Railways) and retired from service in February 1965. By co-incidence, Graham Cripps and his daughter visited our exhibition on Sunday, out on a day-trip from Swindon. It transpires that not only did Graham recognise the Penrice Castle straight away, he actually worked on the train as a fireman for seven years in the 1950s! It was touching to see how moved Graham was by the memories that Fred's painting evoked for him and was a tribute to the quality of Fred's work. He then saw one of Fred's prints of another train - and he had also worked on that one too! Special thanks to Graham for letting us include this in our report. Photo of Graham Cripps courtesy of Greame McFaull.
It's great to report that £2,283 worth of artworks were bought over the three day exhibition, just over double the amount of sales achieved from recent exhibitions earlier this year and in 2021. We sold a total of 39 pieces of art and 94 greetings cards, also a significant increase. Our thanks to everyone by so generously bought a painting or card in support of our art group. Visitors' voteOur fun 'visitors' vote' again featured throughout the exhibition and proved popular. Visitors voted for their favourite painting on display; this is just for fun, there is no prize, however, the artist whose painting receives the highest number of votes always appreciates the accolade. In total, 241 visitors cast a vote, and 106 paintings received a vote. And the winner, with 11 votes, is ... "Summer Evening Breeze" (shown below) by Kay Smith (acrylics). Congratulations Kay! A close runner up with 10 votes was "Bluebell Woods" by Maggie (aka Tracy Warne), followed by Mike Wilson's "Sorting the Catch" , in hot pursuit with nine votes.  Tip for art group members on artwork transportation Large, framed paintings can be heavy to transport to exhibitions and may be vulnerable to damage if they are not wrapped and packed carefully. Karen Road, a LAG member, highly recommends using "Stiffy Bags" (please, no jokes people), a lightweight, bag designed specifically to protect art during transportation. You can find out all about them here. And finally ...
As one Lacock Art Group exhibition closes, the next one looms on the horizon. To find out when our next exhibition takes place, please visit our events page; we will release more information about it nearer the time. Thank you. |
WelcomeRead about our latest activities and initiatives here! Archives
February 2025
Categories
All
|
- Home
-
Galleries
- Workshops >
- Challenges >
-
Members' Galleries
>
- Richard Adams
- Ken Baldy
- Keith Bennet
- Graham Brewster
- Victoria Cleverly
- Sarah Clover
- Dave Cooper
- Chris Crosby
- Margaret Gray
- John Harris
- Jacqui Matthews
- Vanda McCann
- Graeme McFaull
- Karen McGreevy
- Glyn Overton
- Sally Parsons
- Linda Ridler
- Karen Road
- Kay Smith
- Joy Tickell
- Jane Tucker
- Elspeth Wales
- Tracy Warne aka Maggie
- Angela Weir Martin
- Mike Wilson
- Exhibitions
- News/Blog
- Membership
- Events
- Contact


 RSS Feed
Site powered by Weebly. Managed by netnerd.com